| 68 Classifieds User Manual |
| 68 Classifieds User Manual |
68 Classifieds is a PHP based classified program which allows you to sell and manage classified ads. You can concentrate on developing your application whilst iono handles the management of sales and customers at the same time as protecting your investment from piracy by using advanced techniques to ensure that your customers are using your products legitimately.
The first step towards running 68 Classifieds after you have purchased a license is to download the latest version, upload it to your web server and run the installer script.
The following documents will take you through this process.
After placing your order, you will need to visit http://www.68classifieds.com/members/ and insert your username and password.
You will then be logged in and forwarded to the member section.
Now click the link in the navigation labeled "My Licenses". The screen will display all licenses you currently have. Next click the link "view full details" under the product you just purchased.
The following screen should be displayed:
Under available downloads click the one with the highest number.
Click on the file name link. A window will open that asks what you would like to do with the file. Make sure you choose to save the file and then press "OK".
Choose a location where you would like the file to be saved:
And then press the "Save" button.
After you have successfully downloaded the software to your computer you will need to prepare the scripts to be uploaded to your web server.
The first step is to locate the file you just downloaded on your computer and then decompress the files. To do this locate the file you just downloaded and right click it to decompress the files.
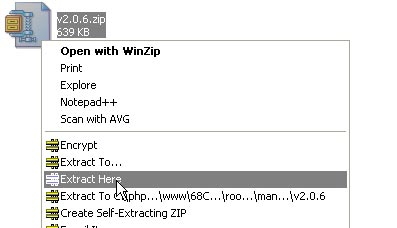
This will bring up a menu and you select unzip or extract here depending on the zip program you have installed.
Note: Please keep the original zip file in a safe place incase you need to reinstall it at a later date.
The folder that contains all the 68 Classifieds files has now been decompressed.
Before running the installation, a database will need to be created. Most hosting companies provide a control panel that aids in this process. Since different hosts offer different control panels, we won't be able to provide specific instructions on this task. Two of the more popular control panels that hosts use are Plesk and cPanel. Instructions for managing databases with Plesk are available here. Instructions for managing databases with cPanel are available here (click on "MySQL Databases" in the table of contents.)
In order to get your files from your computer to the server you will need some type of ftp client. Some of the most popular ones are smartFTP, wsftp, Dreamweaver, and FrontPage. A great place to find one is: http://www.download.com/
Once you have the ftp program installed, connect to your server and upload all the files in the "upload" directory to the location where you want 68 Classifieds to be installed. The files can be installed in the webroot (typically the "www" or "public_html" directory) or in a subfolder that you've created.
Now that the files have been uploaded you will need to CHMOD the following directories to 777 or read, write, execute all:
Open the help section of your FTP program to learn how to CHMOD the directories if you need help.
Now that all of the files have been uploaded you will need to visit the install directory at the url you have 68 Classifieds installed at. For example: http://yoursite.com/install/index.php or http://yoursite.com/classifieds/install/index.php
The install process will step you through setting everything up. Just enter the values it asks for and if any problems arise it will give you a warning.
After you are finished with this step please remove the install directory and also CHMOD the Connections/classifieds.php file to 755.
The run-time loading feature is the easiest way to run encoded files, and lets encoded files locate and install the correct Loader when needed.
Provided that run-time loading is supported on the target system, encoded scripts and Loaders can be bundled together without the user having to install any Loader or update their system configuration, and without having to know about the PHP version or operating system used.
For run-time loading to work, a directory called 'ioncube' containing the Loaders (e.g. this directory) should be placed in or above the top directory of encoded files. For example, if you have encoded files in or below '/var/www/htdocs/', you might place the 'ioncube' directory in '/var/www/htdocs' or '/var/www'. If you have an application or library to distribute, you could place the ioncube directory within the top directory of your project or library.
It's not working - why?
-----------------------
If encoded files fail to run with run-time loading, you can test this by using the helper PHP script 'ioncube-loader-helper.php' that's included in this package.
Installing in the php.ini file is also simple, and offers the best performance for encoded scripts. It is also required for systems that use safe mode, or if PHP has been built with thread support, e.g. on Windows.
The ' php.ini installation instructions' option on the installation helper PHP script is provided to assist with this. Access the script from a web server or a PHP cli or cgi executable and it should tell you which Loader to install, which file to edit and what you need to add (it's just a one line change).
The following section covers information on how to upgrade your site to the latest version.
If you are upgrading from any version of 68 Classifieds over V3.0 then these instructions will apply to you.
If you are upgrading from any version of 68 Classifieds before V3.0 then these instructions will apply to you.
There is a lot of changes from version 2.x to 3.x and you should follow these instructions very carefully.
The Administrator Control Panel is the area of your site that only administrators can access. From here you can control almost all factors of 68 Classifieds.
The first time you log into administration, you'll need to use the username and password that you setup during the install.
The first time you log into administration, you'll need to use the default username and password. These values are "admin" and "mypass, respectively (without the quotes.)
Once you've logged in, look to the left and click on "Browse Members". You will want to modify the admin account with you own personal username and password.
The links in this group handle the managment of your sites listings.
The home page of the administration gives you a breif overview of your site's information. Some of the information shown is as follows:
The browse listings page allows you to browse all the listings that have been added to your site. This page features a small search form at the top to search by date.
A new feature added to version 3.0 is the ability to mass change the status of an ad. This feature makes it easier for you to keep your listings updated.
On the bottom left of the listings it displays the total amount of money the listings have made you.
The search listings page allows you to search listings by a number of options.
The links in this group handle the managment of your sites registered members.
From the browse members page you can browse members by username or view all of your members.
The search members page allows you to search listings by a number of options.
The add member page allows you to manually add a member.
New in version 3.0 is usergroups which allow to assign members to different usergroups. Please see the usergroup section for more information.
When members register they are presented with the option to join your newsletter. This page allows you to send emails to all members who have signed up.
In the body of the email you can enter variables that once sent will convert to the users information.
This feature is brand new to version 3.0 and gives you the ability to define special settings for different user groups.
It comes standard with 5 user groups:
You can modify these groups to allow different groups to see different items on the search results and view listings page.
The links in this group handle the managment of your sites front end, or the portion that the public sees.
The main settings let you define your sites title, description, url, and many other features.
This section also allows you take your site offline to do maintenance.
The search settings defines which fields user's can search by as well as the location of the page navigation and how you want the listings sorted.
The listing view settings defines the way you want your sites view listing page to appear.
The user view settings defines the way you want your sites view member page to appear.
From this section you can select which fields you want to display or not display.
The link named "Image Settings" takes you to the page that let's you control image parameters associated with your customers images.
The link named "Renewal Settings" allows you to setup if you want to let expired listings to be renewed or not.
Regional settings allow you to setup 68 Classifieds with your region of the world.
The date format has a number of options you can use and they match PHP's strftime function.
Here is a list of common settings:
For US websites the common format would be "%B %e, %Y" which would be "August 11, 2005", or "%B %e, %Y %I:%M %p" which would be "August 11, 2005 03:04 PM"
If your country uses Year Month Day then you could use "%Y-%e-%d" which would be "2005-08-11".
The link named "Bad Word Settings" allows you to enter terms you find offensive or would not like to appear in the listings.
For example if you enter "dog" with a replacement as "cat", if someone enters "My dog is great" it will become "My cat is great".
This also works for terms in words as well such as: "My doggy is great" would become "My catgy is great".
The section "User Admin Settings" controls options when a member is logged in.
The section "User Settings" allows you to control what features they can see once they log in.
The link named "User Registration Fields" defines which fields are displayed to a site visitor once they decide to register at your site.
If you turn on the "Security Image" then they will be required to insert the text that is displayed in a "Capthca" image.
Please note these fields are also used in the checkout portion to verify the user's account.
These settings control what is displayed or what actions are taken when a member is placing an ad.
The link "User Registration Fields" controls what user fields are shown or required during checkout.
In the "Statistics" page you have the ability to view new registration stats, new listing stats, and a few other important options.
Through the category section you can add/modify/delete categories as well as ad extra fields.
Edit categories gives you the ability to add, edit, delete, and move categories.
The extra fields option allows you to add to extra fields when the user is placing an ad.
Depending on how you want to use 68 Classifieds you can set these up to your specific needs.
For example if you have a housing category you may want fields such as MLS, address, schools, etc. Then if you have cars you would need information like VIN #, year, make, model, etc.
Payment setup allows you to setup packages, coupons, discounts, and payment providers.
With the coupons and discounts section you can define certain price breaks how you see fit.
In Version 3.0 you can now assign a coupon or a discount to a certain user group which gives you more flexibility in how you set them up.
Payment providers is the section you would setup your classifieds website to take payment.
Once you have created your account, choose "Payment Setup" in the adminstration settings and click modify for 2Checkout. Make sure the Active box is checked, and enter the account number for your 2Checkout account. You do not need to, nor should you enter your secret 2Checkout password.
Log into your 2Checkout account. You should see a list of links and choose the one entitled "Look & Feel" and click on "settings".
Make sure "Direct Return" is set to No and in the box for Approved URL you will need the URL of your thanks.php file, typically http://www.yoursite.com/thanks.php Inside the 68Classifieds administration insert your 2Checkout Store Number and leave the extra field blank.
Click here to create an account with Authorize.net.
For security reasons before setting this up you must have a Secure Server or SSL installed.
Once you have created your account, log in to Authorize.net and select the "Settings and Profile" link. Then click the "Response/Receipt URLs" link and insert the exact URL of this file, for instance . . .
http://www.yoursite.com/admin/authorizenet.php
Now go back to the settings and profile menu and select Obtain Transaction Key. Once you get the transaction key log in to 68 Classifieds administration and insert your merchant login id and transaction key into the fields.
To run a test you will need to put your authorize.net account in demo mode and you can do this through your authorize.net administration area.
Troubleshooting
If you receive an error such as "The referrer, relay response or receipt link URL is invalid" or an error number 14, then please check that the Site URL in your Admin Main page is correct. The Site URL should be the URL of the base of your store. If its not in a subdirectory it would be http://www.yoursite.com. If it is in a subdirectory then you will need to add that, for instance . . . http://www.yoursite.com/classifieds/
Also remember to change http://www.yoursite.com for the actual URL of your site.
If you receive the error "(13) The merchant login ID or password is invalid or the account is inactive." then check that in the Merchant Login ID under the Authorize.net payment providers page of the Admin Control Panel you have entered the Login number not the Merchant ID number.
Click here to create an account with Authorize.net.
Once you have created your account, log in to Authorize.net and select the "Settings and Profile" link. Then click the "Response/Receipt URLs" link and insert the exact URL of this file, for instance . . .
http://www.yoursite.com/authorizenet.php
Now go back to the settings and profile menu and select Obtain Transaction Key. Once you get the transaction key log in to 68 Classifieds administration and insert your merchant login id and transaction key into the fields.
To run a test you will need to put your authorize.net account in demo mode and you can do this through your authorize.net administration area.
Troubleshooting
If you receive an error such as "The referrer, relay response or receipt link URL is invalid" or an error number 14, then please check that the Site URL in your Admin Main page is correct. The Site URL should be the URL of the base of your store. If it's not in a subdirectory it would be http://www.yoursite.com. If it is in a subdirectory then you will need to add that, for instance . . . http://www.yoursite.com/classifieds/
Also remember to change http://www.yoursite.com for the actual URL of your site.
If you receive the error "(13) The merchant login ID or password is invalid or the account is inactive." then check that in the Merchant Login ID under the Authorize.net payment providers page of the Admin Control Panel you have entered the Login number not the Merchant ID number.
Click here to create an account with Linkpoint
Once you have created your Linkpoint Connect account, log in to linkpoint and select the "Linkpoint Connect " link. Then enter the exact URL of the checkout.php file, for instance . . .
http://www.yoursite.com/admincheckout.php
After that is completed you will need to enter the return url which is:
http://www.yoursite.com/thanks.php
Troubleshooting
Remember to change http://www.yoursite.com for the actual URL of your site.
If you are having problems please visit Linkpoint's help manual for more on information on setting it up.
Click here to create an account with PayPal.
Once you have created an account, you need to setup the IPN (instant payment notification). To do this log into your PayPal account and click on the "Profile" tab. Now click on the link instant payment notification preferences link. The URL that you want to enter is the one to the file paypal.php in your admin directory. So for instance it might be
http://www.yoursite.com/administration/paypal.php
After entering this URL, just click the checkbox to activate instant payment notification.
NOTE: Do not setup the "Auto Return" feature through paypal. You just want to use the IPN to forward the user back to the site.
Inside the 68Classifieds administration insert your paypal email address and insert your currency code if it is not USD. Below are the valid currency codes:
Note: If you are having problems getting the return authorization from paypal make sure your host doesn't have a firewall blocking out their ip address.
First log In to the business center and Generate a HOP script. Upload this script to the directory where you installed 68 Classifieds.
Next go to the Business Center and select settings, then HOP Settings and locate the define receipt response urls.
You should enter http://www.yoursite.com/thanks.php for both. Of course change yoursite with you actual site address. Make sure you check the boxes that say: "This URL is a custom receipt page".
Now log in to the 68 Classifieds administration and go to payment settings and select CyberSource. Just mark it as active and you shouldn't have to insert any other values in the rest of the fields.
Listings packages are the actual packages that members have to select in order to place an ad. Each category can have multiple packages but they all need at least one.
Within each package you can define the following options:
New in version 3.0 we are using Smarty Templates which should give you greater flexability in modifying all aspects of your sites to suit your needs. Whether you are beginer or an advanced user the new template structure will be easier to work with.
Through the next sections we will go through instructions for the templates.
68 Classifieds V3.0 is setup with the following directory structure:
All of the files with the extension of ".tpl.php" are template files. The main template file is layout.tpl.php which controls the over all look of your site.
If you open this file you will notice it looks just like a standard html page except for some variables that look like this: "{$title}".
For those familiar with php it is exactly the same as: <?php echo $title; ?>
Another portion you should be aware of is:
{* This includes the content portion *}
{include file=$body}
This includes a body file defined within the script, or basically all the other tpl.php files in the template directory.
Once you understand how the new template structure works you can begin modifying the template files to suit your needs.
V3.0 features a new template module system where you can call extra display options.
The following modules can be called: "Featured Listings Vertical", "Featured Listings Horizontal", "Most Viewed", and "Recently Viewed". Each of these modules have certain code that you must enter in your template file before they are shown.
"Featured Listings Vertical" - To display this you would use {feature_listings_vertical number=8 table_attr='width="50%"' td_attr='valign="middle" align="center"'}
Here is a break down of each feature:Featured Listings Horizontal - To display this you would use {feature_listings_horizontal number=8 cols=3 table_attr='width="100%" style="border: 1px solid #000;"' td_attr='valign="middle" align="left"'}
Here is a break down of each feature:Most Viewed - To display this you would use {most_viewed number=8 table_attr='width="50%"' td_attr='valign="middle" align="center"'}
Here is a break down of each feature:Recently Viewed - To display this you would use {recently_viewed number=8 table_attr='width="50%"' td_attr='valign="middle" align="center"'}
Here is a break down of each feature: