|
|
|
|
The first step towards running 68 Classifieds after you have purchased a license is to download the latest version, upload it to your web server and run the installer script.
The following documents will take you through this process.
The following documents will take you through the process of downloading the files.
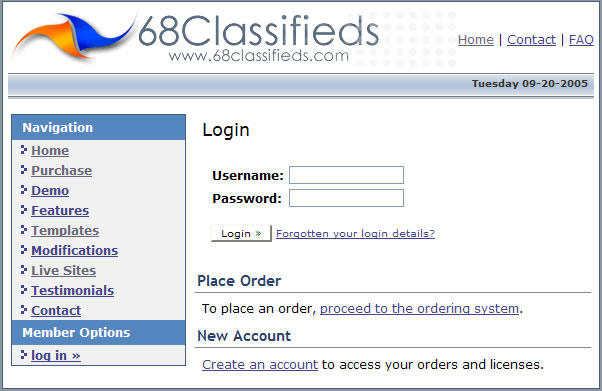
During checkout, you were asked to create an account. The username and password that you created will be used to login to the members area as well as the forum. The members area or 'dashboard' is where you will download 68 Classifieds, manage your account, obtain your licenses and purchase additional licenses if more classifieds sites are in your future. To login to the dashboard, visit http://www.68classifieds.com/members/index.php
Enter the username and password that you created during checkout to login and press the 'Login' button.
You will then be forwarded to the main page of the dashboard.
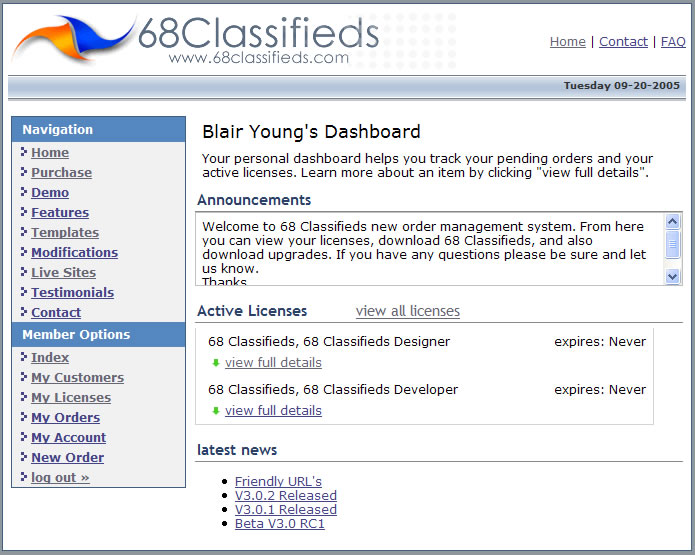
There is a 'View Full Details' link under each of the products you have purchased. Click on this link to view the product's details.
Once you've been forwarded to the product's detail page, you should see:
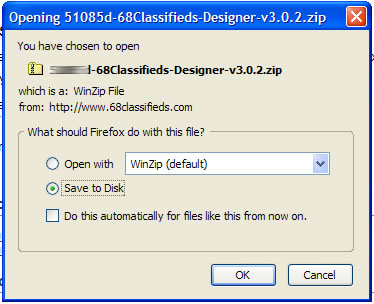
In the 'Available Downloads' area, there may be more than one file available for download. We recommend that you download and install the latest version of 68 Classifieds (version 3.0.2 as of this writing). Click on the appropriate link to download the files to your local computer. A window will open that gives you the choice of opening the file or saving it to your computer.
Choose to save the file-
Save the file in a location that you can remember.
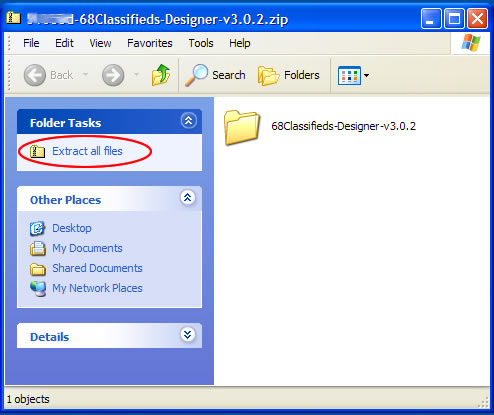
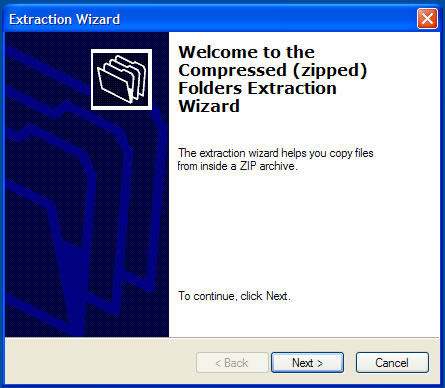
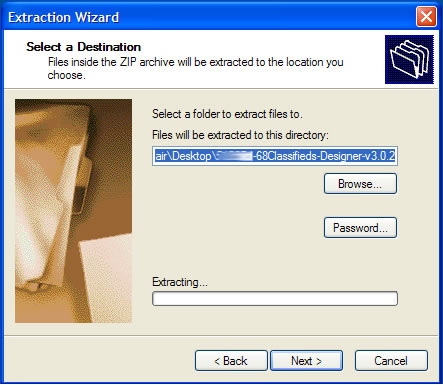
There are a number of great products that allow you to decompress the zip file you've just downloaded. Some of these include winzip (http://www.winzip.com/) and pkzip (http://www.pkware.com). If you're using Windows XP, an extraction wizard is already installed on your computer. The images included in this section will be of the extraction wizard included in XP.
Open Windows Explorer (right-click the 'Start' and choose 'Explore') and navigate to the file you just saved. Double-click the file. Another window will open showing the compressed folder:
Now that you've successfully downloaded and unzipped the files, the next step is to upload the files to your server.
We'll use a method called 'FTP-ing' (FTP = File Transfer Protocol) to transfer files from your computer to your host's server. You'll need an FTP application in order to complete this process. Some popular FTP programs are SmartFTP (http://www.smartftp.com), CuteFTP (http://www.cuteftp.com) and FileZilla (http://filezilla.sourceforge.net/). If you don't have an FTP program installed, you can use Windows Explorer to transfer files.
Please note: It's very important that ALL your files are uploaded to the server in order for your site to work properly. Some 68 Classifieds customers have had problems using Windows Explorer for FTP'ing their files. More advanced FTP programs will actually report which files were not successfully uploaded. Each of the FTP programs mentioned above should be fine but of the three, we prefer FileZilla. We've included images from FileZilla and Windows Explorer in our example.
Start your FTP program (or Windows Explorer).
Enter your FTP details (URL or IP, username and password). These should have been provided to you by your host. If you do not have this information, you'll need to contact your host to get this information. (For customers who want to use Windows Explorer, you will enter ftp://[email protected] in the address field to connect.)
Once you're connected, you should see two panes with files listed in each. One pane represents your local folders and files while the other pane represents the folders and files on your server.
In most circumstances, your host provides you with access to a directory just above your webroot. In other words, when you initially connect to your server with your ftp program, you should see a file named 'www' or 'public_html' (possibly both). Your website files will be uploaded to either the 'www' directory or the 'public_html' directory. Double-click the folder to view its contents.
If you have a new account, there may already be a few files and folders inside your public directory. These files were placed there by your host. If you have already installed a site, then you should see all the files and folders that make up yourexisting site.
You should decide whether you want your classifieds site to be your site (most customers opt for this method) or whether you want your classifieds to be in a subdirectory (such as http://www.mysite.com/myclassifieds/). Keep in mind that you will have the ability to create new pages and modify their contents from within the administration area.
--If you decide you want the classifieds to be your entire site --
--If you decide you want the classifieds to be in a subfolder --
PLEASE NOTE: All references in the rest of this user's manual will refer to your site address as "www.yoursite.com". If you have installed the script in a subfolder, remember to include the subfolder in the address to view the classifieds section in a browser (for example: www.yoursite.com/classifieds/).
CHMOD is a command that stands for 'CHange MODe' and is used on *nix computers (Linux, Unix, etc) to set the permissions of files and folders. These permissions include read, write and execute. We need to change the permissions on 5 folders and 1 file:
If you're using SmartFTP, CuteFTP or Filezilla, right-click on the first folder. A menu should appear that says either 'File Attributes' (in FileZilla) or Properties/CHMOD (in SmartFTP and CuteFTP). Choose the applicable menu option for your FTP program. A new window will open that identifies the current permissions of the file. Replace the three-digit number in the permissions field with 777. Repeat these steps for all 5 folders and 1 file (the classifieds.php file in the connections folder) that are listed above.
If you are using Windows Explorer, setting the permissions will be a little different. In the server pane of Windows Explorer, right-click the folder or file and choose 'Properties' in the menu. A new window will open that has three rows and three columns of check boxes that you will use to set the permissions. Place a check in each of the nine boxes and press the 'OK' button. Repeat these steps for all 5 folders and 1 file (the classifieds.php file in the connections folder) that are listed above.
Before running the installation, a MySQL database will need to be created. Most hosting companies provide a control panel that contains all the tools necessary to create databases. Since different hosts offer different control panels, we won't be able to provide specific instructions on this task. Please read through your host's documentation or contact them directly to find the location of your host's control panel.
Two of the more popular control panels that hosts use are Plesk and cPanel. Instructions for managing databases with Plesk are available here. (http://download1.sw-soft.com/Plesk/Plesk7.5/Doc/plesk-7.5r-clients-guide-html/ch03s54.html) Instructions for managing databases with cPanel are available here (http://www.cpanel.net/docs/cpanel/) (click on "MySQL Databases" in the table of contents.)
Some notes regarding database creation:
So far, we've downloaded the files from the 68 Classifieds site, unzipped the files, uploaded the files to the server, changed the permissions on 5 folders and 1 file and created our database. We're now ready to start the installation process.
So far, we've downloaded the files from the 68 Classifieds site, unzipped the files, uploaded the files to the server, changed the permissions on 5 folders and 1 file and created our database. We're now ready to start the installation process.
Open a browser window and visit www.yoursite.com/install/index.php (replacing 'yoursite' with your domain name). The first page should look like this:
NOTE: If the page is instead displaying text that says "The file /home/youraccount/public_html/install/index.php has been encoded with the ionCube PHP Encoder and requires the free ioncube_loader_something_here.so ionCube PHP Loader to be installed.", then you will first need to visit the section in this manual entitled "Ioncube Loader Installation".
If you're reading this section, then you have probably encountered a problem with Ioncube.
Ioncube provides the ability for software developers to encode or encrypt their files so that their work cannot be easily copied and redistributed without their knowledge. In order for website files to run, the ioncube loaders must be installed with the files so that they can be decoded and seen by a web browser. If the correct loader files are not present, then the files cannot be read (or decrypted).
The reason that we had to start using Ioncube to encrypt our files is that we found some websites were making copies of our software freely available. While it flatters us that the popularity of our work continues to increase, it also frustrates us to know that there are people using stolen copies of 68 Classifieds. It's not just that we were losing money (which, theoretically, we were) but it was unfair to you, the customer, who went through the proper steps to obtain the script.
There are a couple of things we can check before we choose which Ioncube loader will be right for your site.
a. Step 1
First, open a browser window and visit www.yoursite.com/ioncube/ioncube-loader-helper.php (replacing 'yoursite' with your site name). Click the link 'run-time loading installation instructions'. The file runs a test to see if it's possible for your system to use a run-time loader.
After completing the test, you should see the test results "Run-time loading should be possible on your system but no suitable Loader was found." If these are not the results you receive from your test, you will need to contact your host because a run-time loader is not possible. Usually, your host will have to either "Turn off 'safe mode'" OR modify the "php.ini" file. When you contact your host, provide the location of the ioncube helper file (www.yoursite.com/ioncube/ioncube-loader-helper.php) so that they can see the results of the test you've just run.
b. Step 2-
If you received successful results from the ioncube run-time loader test (that is, your results say "Run-time loading should be possible on your system but no suitable Loader was found."), our next step is to determine which of ioncube's run-time loaders are right for your system.
In your browser's address field, type in www.yoursite.com/administration/siteinfo.php
This page will display information about your server and the configuration of some settings made by your hosting company.The information we need is the Operating System and the microprocessor architecture. Don't worry - the page you're looking at makes getting this information very easy!
The first row in the first table should display the information we need.
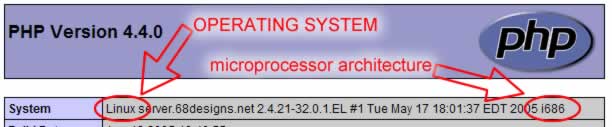
The two items highlighted here indicate our operating system and the microprocessor information. Your information may differ from the example.
c. Step 3-
Open a second browser window and visit http://www.ioncube.com/loaders.php
The page contains a list of run-time loaders which you can download. Look down the list and find the loader that is right for your system. Click on the accompanying zip link. A new window should open asking if you want to open the file or save it to your computer. Save the file to a location you can remember. You can now close the second browser window.
Once it has been saved, the file will need to be decompressed.
d. Step 4-
Once the file has been decompressed, revisit http://www.yoursite.com/install/index.php
The warning ""The file /home/youraccount/public_html/install/index.php has been encoded with the ionCube PHP Encoder and requires the free ioncube_loader_something_here.so ionCube PHP Loader to be installed." should still be visible. Take note of the ioncube loader the page is saying is missing.
e. Step 5-
Next, connect to your server with your FTP program. Open the ioncube directory (/public_html/ioncube/) and upload the appropriate run-time loader file from the folder that you just decompressed. Once the file has been uploaded, revisit http://www.yoursite.com/install/index.php and refresh the page. The warning message should be gone and the first page of the installation should appear.
If you continue to encounter problems after completing the steps in this section, please contact us so that we can help you get the problem resolved.
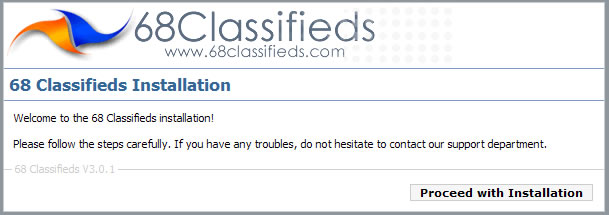
You should have your browser window open and viewing the http://www.yoursite.com/install/index.php page. Click on the "Proceed with installation" button.
Read through the license agreement and, if you agree, click on the "Proceed with Installation" button.
The next page you see should look like this...
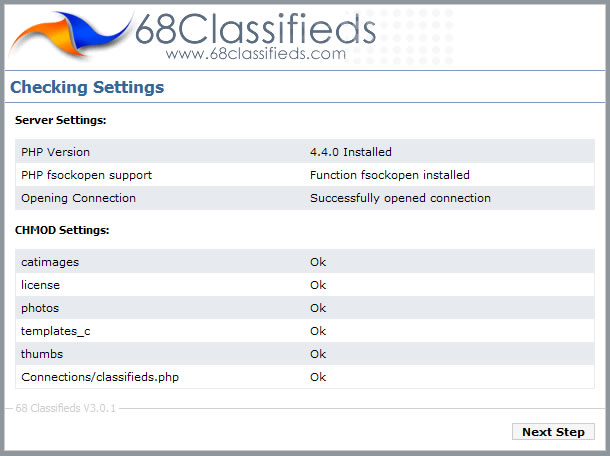
The page checks to see whether or not the server has the correct settings and whether or not your 5 folders and 1 file have been CHMOD'ed successfully. If you are receiving an error in the "Server Settings" section, please contact us for further information. If you are receiving errors in the CHMOD settings area, please visit the section in this user manual entitled (****INSERT LINK HERE****) "CHMOD your folders and files" to resolve the errors. Refresh the page once you have changed the permissions of the folders and files.
When all the server and CHMOD settings are correct, a button named "Next Step" appears. Click this button to continue to the next step.
The next page contains a form where you can enter your database information:
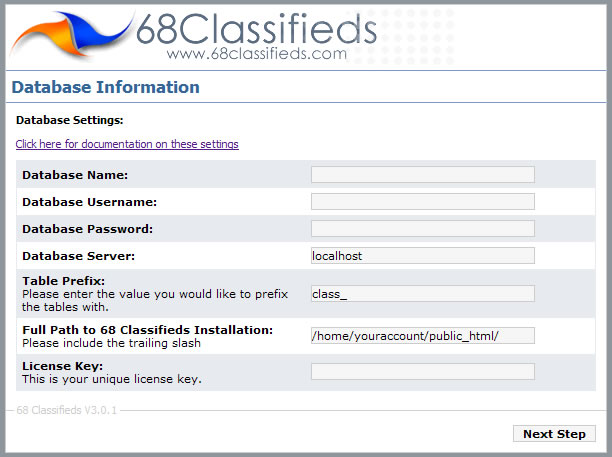
Database Name: This is what you named your database. Please note: some hosts will append your account name to the database name that you provided (for example "myaccount_classifieds"). Enter the database name without quotes or spaces.
Database Username: This is the username of the person who has access to the database. This value was provided by you when the database was created. Please note: some hosts will append your account name to the username (for example "myaccount_username"). Enter the username without quotes or spaces.
Database Password: This is the password that you provided when the database was created. Normally, hosts DO NOT append the account name to the password. Enter the password that you created without quotes or spaces.
Database server: This is the database server location. A vast majority of hosts have the database server running on the same computer and, therefore, "localhost" (without quotes) is the correct value.
Full Path to 68 Classifieds Installation: This value is provided and shouldn't need to be changed.
License Key: Enter the license key that you have been provided. The license key can be retrieved by logging in at http://www.68classifieds.com/members/
Click the "Next Step" button. Your information will be verified and a test will be performed to verify that a connection to the database has been made successfully. If you get a warning message of "Database Error: Access denied for user: 'username@localhost' (Using password: YES)", please log in to your host's control panel and view the connection values to use when establishing a connection to the database. The control panel should have all these values (except for the password) available to you.
If a connection to the database was successful, this will be indicated on the next page. Click the 'Next Step' button.
The next page is where we will enter our initial administration settings.
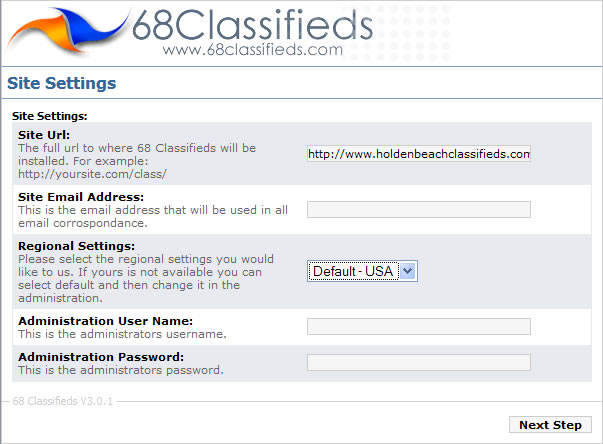
Site URL: Enter the location where you have installed the classifieds script (including the trailing slash "/"). If you have installed the site in a subfolder, enter the folder name after your site name (such as "http://www.yoursite.com/classifieds/").
Site Email address: Enter the address where you would like to be notified when someone places an ad or uses the 'Contact Us' form.
Regional Settings: Choose the appropriate settings for your location. If yours is not available, you can select 'Default' and then change it in administration afterwards.
Administration User Name: Enter the username you would like to use to log in to the administration area.
Administration Password: Enter the password you would like to use to log in to the administration area.
Click the 'Next Step' button.
The next page should indicate a successful installation.
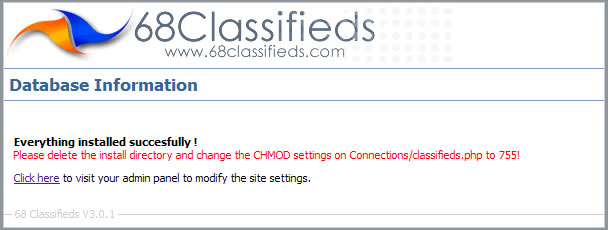
The final step after installation will be to COMPLETELY DELETE THE ENTIRE 'INSTALL' DIRECTORY. If this is not done, your site will not work correctly. Connect to your server with your FTP program and open your 'public_html' directory. You should see the 'install' directory listed. Highlight it and press your 'Delete' key. Confirm the deletion and verify that the 'install' directory has been completely removed.
Next, open your 'Connections' folder and right-click on the 'classifieds.php' file. Change the permissions to 644. Windows Explorer users: This will be "Owners - Read and write (no execute), Group - Read (No write, no execute), Public - Read (No write, no execute)"
CONGRATULATIONS! You have successfully installed 68 Classifieds!
From time to time it will be necessary to upgrade your 68 Classifieds installation to the latest version, either to gain new features or to fix newly discovered bugs.
The following documents will take you through this process.
You will need to login to 68 Classifieds member section to download the latest release. Once you are logged and are at the download page you should see two different versions. One labeled install and one labeled upgrade.
You will want to download the one labeled upgrade. Although both releases are the same the upgrade version leaves out the connections/classifieds.php file to prevent you from overwritting your original.
You will need to open your ftp program and connect to your server where you have 68 Classifieds installed.
Now upload all the new files from the zip you downloaded. This could take a little while but be sure all the old files are overwritten with the new ones. After they are all uploaded visit yoursite.com/install and follow the upgrade steps. It will ask you what version you are upgrading from that way the correct database changes are made.
Finally after that finishes delete the install directory and your site should be upgraded to the correct version.
The following section covers your 68 Classifieds administration area.
Open a browser and visit http://www.yoursite.com/administration/ (Keep in mind that if your classified program is located in a subfolder, you will need to visit http://www.yoursite.com/name_of_subfolder/administration/)
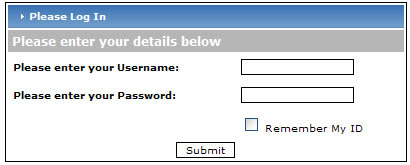
Enter the username and password that you created during the installation of your site.
The manage listing section handles everything dealing with the managment of ads.
The "Home" page provides general information about your classifieds version, the number of members, newsletter subscribers and ads waiting your approval.
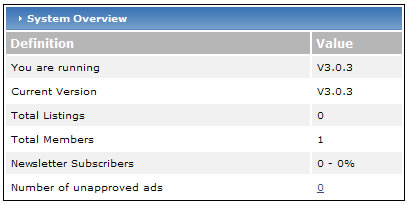
Also, if an update is available, the homepage lets you know by providing a link to 68 Classifieds member's area.
The "Browse Listings" page initially shows you any ads that have been placed today (since midnight). We've included 'Last Month', 'Last Week', 'Last 24 Hours' and 'Today' links so that you can easily display ads placed within each of those time periods. If you would like a different time span, you can enter the beginning and ending dates in the text fields and press the 'Go' button. The 'Cal' buttons will display a calendar where you can point and click to a specific date to enter their values in each field.
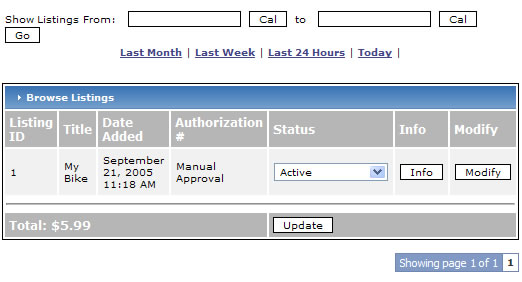
The 'Total' value at the bottom of the page shows the money you've collected from the listings shown on the page.
You can change the status of a listing by selecting a different status in the drop-down box and then pressing the 'Update' button at the bottom of the page.
The 'Info' button will forward you to the ad's detail page. This provides a snapshot of the ad as it will appear on your site except that it also includes the ad placer's IP address.
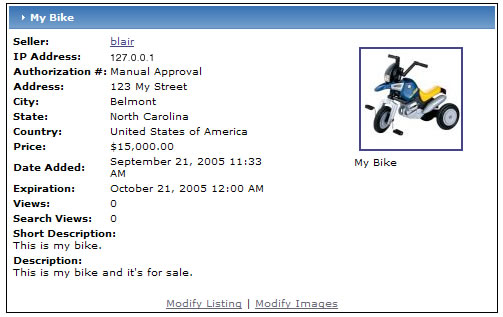
You can modify the details of the ad by clicking the 'Modify Listing' link and add or delete images by clicking the 'Modify Images' link.
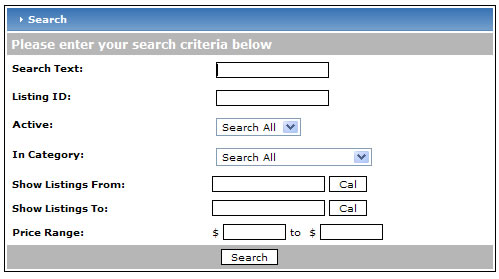
The 'Search Listings' page includes a form that let's you search for listings.
It's possible to add your own listings from administration. Visit the 'Add Listing' page and fill in the information as required. Once the initial information is submitted, you'll be forwarded to the ad's detail page where you can modify the ad's images.
The manage listing section handles everything dealing with the managment of your members.
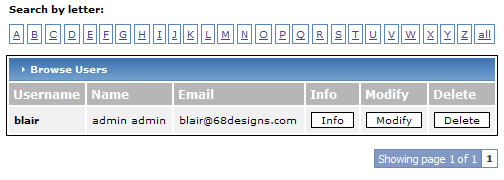
The 'Browse Members' page will show a list of your members. The list includes ALL members, no matter what usergroup they belong to (for more information about Usergroups, see section "E" below).
Alphabetical links are provided so that you can jump directly to members whose username begins with the letter you've clicked. Buttons are provided so that you can view the member's details, modify the member's details or delete the member.
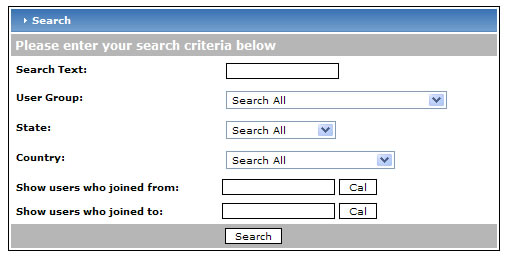
The search members page includes a form that helps you locate members. You can fill in as much or as little information that you have about a member in order to display a list of all members who fit your criteria. The first field, "Search Text", looks for matches in the member's username, name and email address. The form also allows you to filter results by User Group, State, Country and the date the member subscribed.
Modifying a Member
You can modify a member by clicking the "Modify" Button from any page that lists members ("Browse Members" or the results from "Search Members"). Once you've made the necessary changes, press the "Submit" button for the changes to be saved.
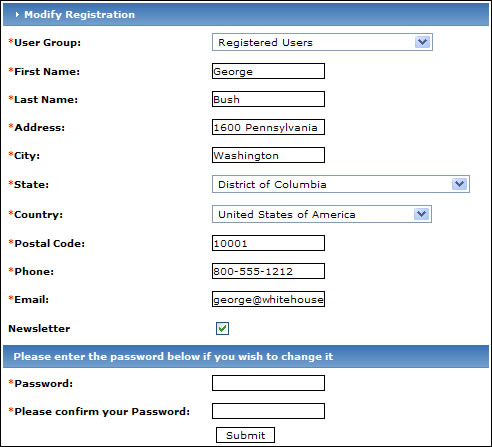
Please note: The most important field on the usermodify.php page is the User Group field. Anyone who is registered in the system (including administrators!) must belong to a group. Be aware of the changes you make to this field. Theoretically, it's possible to provide administrative access to any member in the system.

You can add members from within administration by completing the form on the "Add Members" page.
You can email members who have indicated they would like to receive a newsletter. The email can, of course, be the announcement of discounted pricing, news or any other topic that you think your members would be interested in. When you click on 'Send Newsletter', a page opens that lets you enter the subject and text of your email. If you want to send out HTML emails, you can design a newsletter in Dreamweaver or Frontpage and then copy and paste the HTML in the text area although it is important that you strip out unnecessary tags (see http://www.florentinedesign.com/articles/html_email_uness.htm for more information) Indicate whether the pasted text is HTML in the checkbox.
Other tips for sending mail:
The 'User Groups' page let's you create groups which, in turn, can have different rights assigned to them. The default groups initially included with 68 Classifieds are:
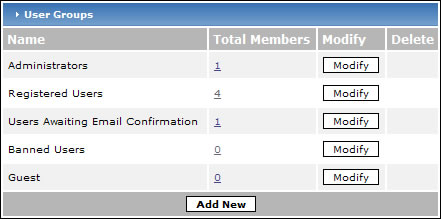
Users assigned to the administrator's group can log into the administration panel with their username and password. More than likely, if you're reading this user's manual, you're included in this group.
Registered Users are people who have filled out the registration page and confirmed their information by responding to the confirmation email. This group includes people interested in placing ads or guests who would like to save ads to their 'favorites'.
'Users Awaiting Confirmation' have filled out the registration form but have not yet confirmed their subscription by clicking the link in the confirmation email. Possible reasons why there are people in this group include: they may have provided a fake email address, they may have entered their email address incorrectly, etc.
'Banned Users' are members that are not allowed to view any portion of your site - they are banned from the site. Members are added to this group by an administrator. (Click on 'Browse' or 'Search Members' to locate the offensive member. Click on 'Modify', change the group to which they're assigned and then click 'Submit'.)
'Guests' are considered to be anyone who is not currently logged in.
You can modify the rights of each group by pressing the 'Modify' button. You will be forwarded to a page that lists the rights of that specific group.
The example we've provided includes the default settings for the 'Registered Users' group.
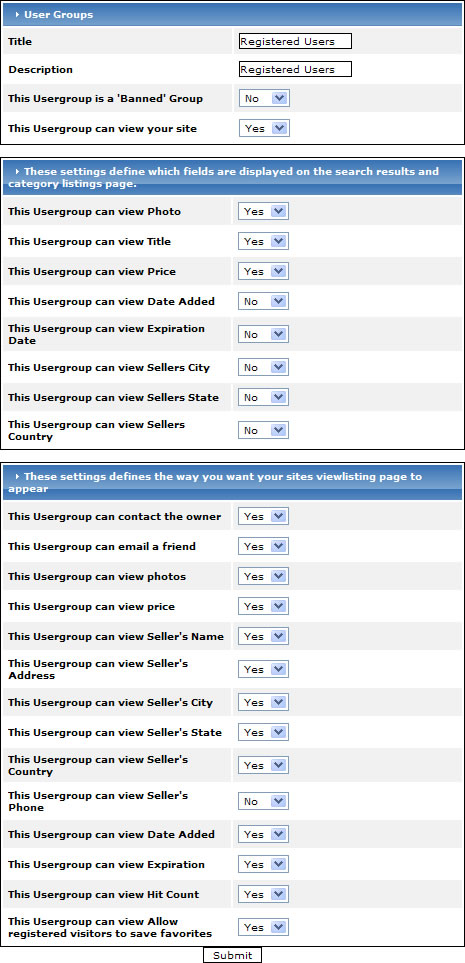
As you can see from the example, you can change the rights, permissions and views of each group to customize your classifieds site as you see fit.
You can easily create a new group by clicking on the 'New Group' button and filling out the subsequent form. Members can be transferred to a newly-created group by modifying their member details.
The front end settings deals with your sites front end or the portion site visitors sees.

New to version 3.1 is a module system. This section allows you to insert modifications or hacks with out messing with the core files of 68 Classifieds.
68 Classifieds comes with several modules already built but you can find others by visiting our forums or our modifications section.
Installing a module does take several steps and we will go through setting up one.

The search settings page provides the ability for you to define which ad fields are searchable.
Search Price - Allows visitors to search by price. If set to "No", the field is not displayed on the search page.
Search City - Allows visitors to search by city. If set to "No", the field is not displayed on the search page.
Search State - Allows visitors to search by state. If set to "No", the field is not displayed on the search page.
Search Country - Allows visitors to search by country. If set to "No", the field is not displayed on the search page.
Page number location - If a visitor performs a search and their results take up more than one page, a small navigation table will appear on the search results page in the location that you designate in this field.

Max number of search results per page - The value you enter in this field will be the number of results on each page after a visitor performs a search. If the number of results is greater than the value you enter here, the navigation bar mentioned above will appear that lets the visitor navigate through their results.
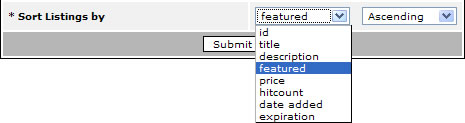
Sort Listings by - This field lets you control the order in which a visitor's search results are displayed.
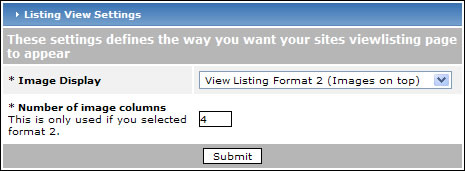
The 'Listing View' settings define the layout of your ads' details' pages. You can choose from 'View Listing format 1 (Images on Right)' or 'View Listing format 2 (Images on Top)'. If you choose to use format 1, the images will appear on the right side of the page in one column with as many rows as necessary. If you choose to use format 2, you can define the 'Number of image columns' value to specify how many columns the image table will use to display the images. Rows will be added as necessary if the number of images for the ad are greater than the value you specify.
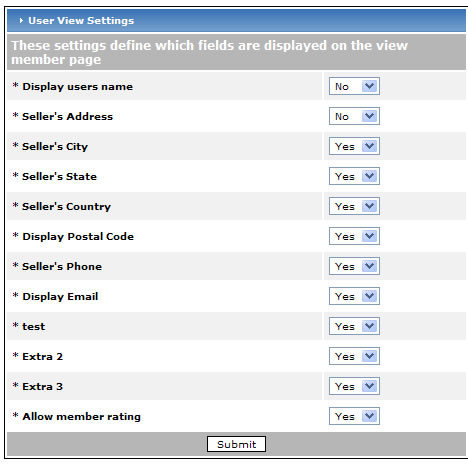
When a guest or member views an ad, they can click on the ad-placer's name to view the person's details. The 'User view Settings' page lets you define which fields are displayed on the page.
For each category, just select 'Yes' or 'No' depending on whether you want that particular field to be displayed.
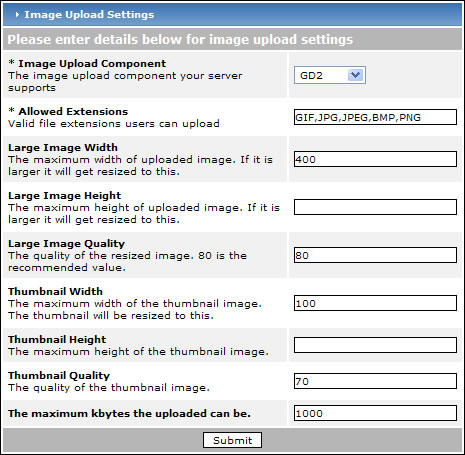
The 'Image Settings' page allows you to define a variety of settings related to image upload and the size of the images for your site.
"Size exceeds limit!
Filename: their_filename.jpg
Upload size exceeds limit of (your value) kb
Please correct and try again"
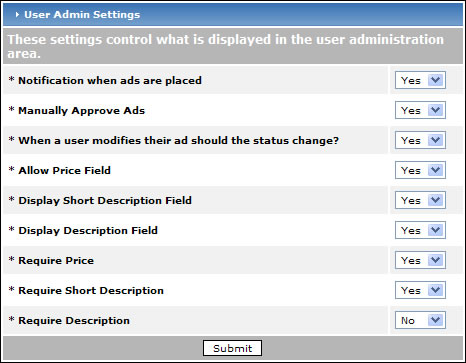
The 'User Admin Settings' section of administration lets you modify certain portions of your members registration and administration pages.
The 'User Settings' page lets you control whether an ad's "stats" are viewable by the member.
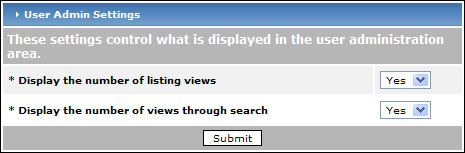
Display the number of listing views - If you want your members to see the number of times their ad's details have been viewed, then choose "Yes" here. Otherwise, choose "No".
Display the number of views through search - If you want your members to see the number of time their ad has been included in a visitor's search results, enter "Yes" here. Otherwise, choose "No".
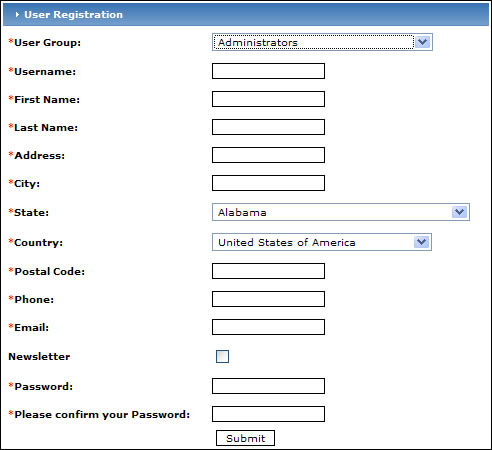
The 'User Registration Fields' page lets you define what information you collect from new members during registration. For each field, you have the choice of displaying it or requiring it. (Please keep in mind that 'Required' only works if 'Displayed' is checked.)
Extra Fields - If you would like to collect some other piece of information that's not included in the list, just enter a descriptive title (Shoe Size, Dog's Name, etc.), choose 'Display', and the new field will be added to the registration form. 'Extra Field 1' appears above the member's information at the top of the form and 'Extra Field 2' and 'Extra Field 3' appears below the member's information.
When someone places an ad, the 'User Checkout Settings' page defines what fields are used, what fields are required, whether admin is notified, etc.
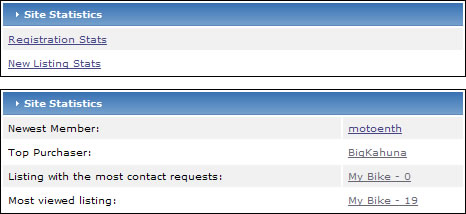
The 'Statistics' portion of administration includes membership and new listing stats as well as a maintenance link that lets you "flush" your compiled templates and creates backups of your database.
You can view ad stats by using the 'Statistics' pages. The main page includes two links that let you view registration stats, and new listing stats. It also includes information about which of your members is the newest member, the top purchaser, which listing has had the most contact requests and which listing has been viewed the most times.
Click on registration stats and you will be forwarded to a form that lets you specify a beginning and ending date range to view that periods registration information.
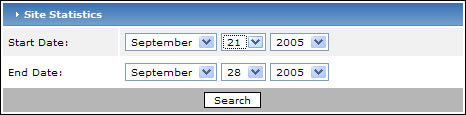
Choose the beginning date and ending date and press the 'Submit' button.
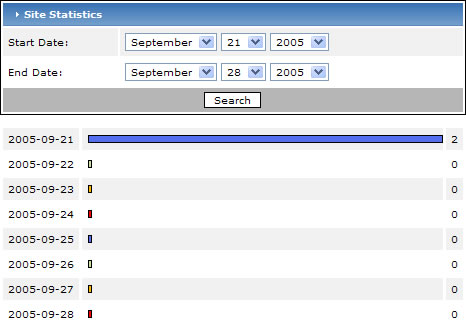
Likewise, click on the 'New Listing Stats' on the main statistics page and you will be forwarded to a form that lets you specify beginning and ending dates to view new listing information.
The 'Maintenance' link forwards you to a page that lets you "flush" your compiled templates and create backups of your database.
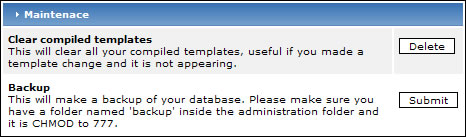
Clear compiled templates - 68 Classifieds was built with a "templating system" named "Smarty" (more information available at http://smarty.php.net) When a page on your site is called by a browser, a copy of the page is saved (or "compiled") in the templates_c directory. This is done so that pages can load faster the next time they're requested. If you have made custom changes to a template file (a file ending with "tpl.php") and uploaded your changes, it's possible that the changes will not show up immediately because the compiled page is being sent to your browser. You can "flush" the compiled templates on the 'Maintenance' page by pressing the 'Delete' button.
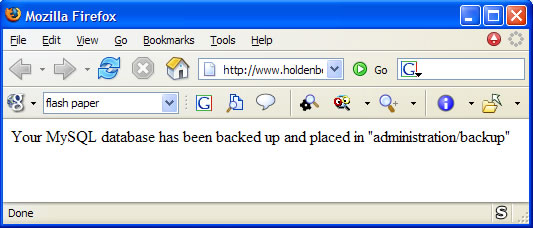
Backup - It's necessary that you have created a new folder on your server named 'backup' (without the quotes) inside your administration folder and set its permissions (CHMOD'ed) to 777. Once the backup directory is created and its permissions set correctly, press the 'Submit' button to create a backup of your database. A new window will open that confirms the backup file has been created.
The 'Category' area is where you will create and/or modify the categories and subcategories for your site. You can create as many categories and subcategories as you need. If you have more than a few categories and subcategories to create, it may help to write them out first to determine the best structure.
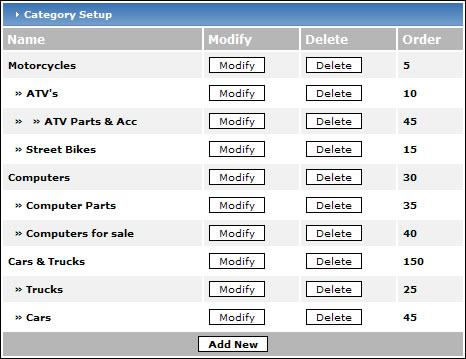
When you click on the 'Edit Categories' link, a page loads that lists your current categories and subcategories in the left column of the table. The top categories will be left justified with their subcategories listed underneath. Subcategories will have two greater-than symbols (">>") indicating that they are a "child" of their "parent" category. Keep in mind that subcategories can also have subcategories placed in them. These will be designated with a second pair of greater-than symbols (">>"). For each level down in the category structure, another pair of greater-than symbols (">>") will appear next to the name designating their place in the category hierarchy.
Add a New Category - To add a new category, click the "Add New" button. A new page will load:
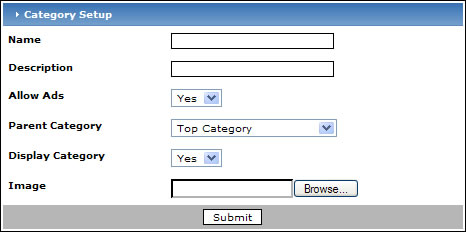
Name - Enter a name for your new category.
Description - (not required) Enter a description for the category. Please note: if this category has subcategories placed within it, the names of subcategories will appear on your site just underneath the the parent categories name. If the category only contains ads within it, the description will appear. Since the "Motorcycles" category has subcategories in it, the subcategory names will appear on your site.

Since the "ATV Parts and Acc" category has no subcategories in it, the description will appear on your site.

Allow Ads - If you would like to give your customers the ability to purchase ads and place them within this category, choose "Yes" here. Otherwise, choose "No". It's a good idea to choose "No" for any category that contains other categories and choose "Yes" if the category will contain only ads.
Parent Category - If you would like to place your new category within another category, choose its parent category here. Otherwise, choose "Top Category".
Display Category - If you don't want the category to appear on your site, choose "No" here. This is a useful feature if you want to add a lot of categories and subcategories prior to displaying them on your site. If you hide the topmost category, any categories below it will not be seen.
Image - If you would like to have an image next to the category's name, you can choose an image to upload here. Click the "Browse" button and navigate to the image you would like to use. Keep in mind that category images are not resized so you must format the height and width of the image prior to uploading it.
Press the 'Submit' button to save your changes.
2. Deleting a Category - to delete a category, simply press the 'Delete' button. A warning message will pop-up asking you to confirm the deletion. Any categories within the deleted category will not be deleted but will no longer be displayed because it's parent is missing. So, it's advisable to start from the lowest category and work your way up. Also, ads located within deleted categories are not deleted so it's advisable to either delete the ads prior to deleting a category or move the ads to a category you intend to keep.
3. Reordering your Categories - By default categories sort alphabetical then by weight. If you would like a category to appear first then you would change it's weight to a higher amount. The higher the weight the more it goes to the top.
The first step is to define the order of your parent categories (Motorcycles, Computers, Cars & Trucks). They have order numbers of 150, 30, and 5 respectively. So, they are displayed from highest to lowest number (Motorcycles, Computers, Cars & Trucks). If you wanted to put Cars & Trucks after Motorcycles and before Computers, you modify that category and assign a number between 30 and 150.
As a side note, the code only looks at the value of the number in relationship to other numbers of that same level (and parent category if it's a subcategory). In other words, you could give "Computers for sale" a number of 5 to put it before "Computer parts". It won't affect the "Motorcycles" category because "Motorcycles" is on the "Parent Category Level". You could also give "Computers for sale" a number of 25 with no problems even though "Trucks" has 25 assigned. There won't be a conflict because "Trucks" is assigned to a different parent category.
As of version 3.1 there are 7 types of "Extra Fields" you can create and associate with your categories - drop-down list, checkbox list, single-line text field, multiple-line text field, file upload, parent drop-down list, or child drop-down list.
The following sections cover details on how to setup each type.
To create a new drop-down list, click the "New Option" button.
You will be forwarded to a page that lets you enter information about the field:
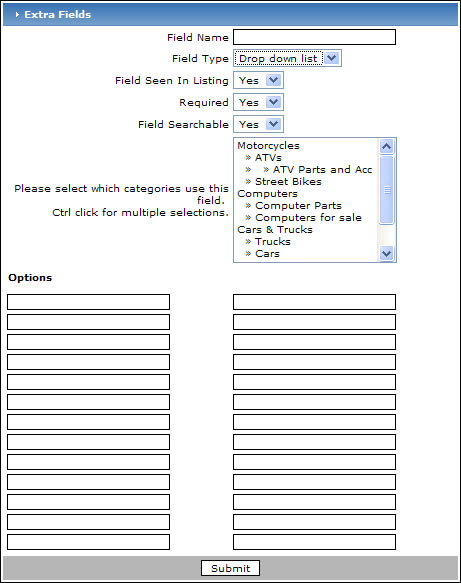
To create a new Single-line text, Multi-line text, or file upload field, click the "New Text Option" button.
You will be forwarded to a page that lets you enter information about the field:
The advanced parent child select list is complicated to set up but does give you more power to associate fields to each other.
Some examples for reasons to use this type of fields could be make -> model options for cars, or state -> city for realestate ads. But you can use your imagination and create these for all sorts of sites.
In this example we will be using cars with a make model choice, but again this can be changed to whatever suits your site.
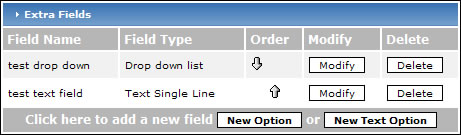
As of version 3.1 the extra fields are ordered differently than previous versions. However we will leave the original documentation below.
In v3.1 a new column is added on the far left labeled "Order". To change the order of an extra field you will use the drop down and select the number where you want the extra field to be moved to.
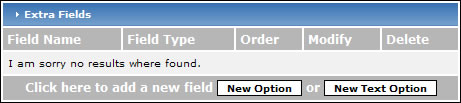
In v3.0 once you've created more that one extra field, another column will appear in your extra field list named "Order".
If you would like to change the order in which your extra fields are displayed, click the up arrow to move the extra field one position up
The 'Payment Setup' area is where you will setup your site to take payment.
Coupons can be sent to customers and then used to reduce the price of their listing. They will enter the coupon code in the "Coupon Code" field during checkout. Discounts are applied to all ad packages and do not require a coupon code. Discounts are available to everyone during checkout whenever they are available. To view your list of coupons and discounts, click the "Coupons & Discounts" link. A page appears with your coupons and discounts listed.
The "Payment Providers" section is where you will setup your payment gateway(s). We've included some of the most popular payment gateway providers to facilitate this process. Click on "Payment Providers" to view a list of available payment providers:
Providers that have been setup and are active will show up at the top of the list in bold.
Paypal - Click here to setup an account with Paypal
Once you have entered your Paypal information on this screen, you will need to login to your Paypal account and activate IPN (Instant Payment Notification). Here are the steps for activating IPN (from Paypal's website).
More information about Paypal's IPN feature is available here.
2Checkout - Click here to setup an account with 2Checkout
Payment Provider Name - Enter the name of the payment provider here.
Show As - If you have multiple forms of payment setup, your customers will have a choice as to which method they prefer. Enter the value you would like your customers to see such as "Credit Card", "Paypal" or "Mastercard, Visa" (without the quotes.)
Active - Place a check in the box to make this payment provider active. If this box is not checked, the payment provider will not show up in the payment provider list during checkout.
Demo - If you would like to test the payment provider settings, place a check in the "Demo" box.
Store Number - Enter your 2checkout store ID number here.
Extra - This field is not used with 2checkout payment setup - please leave it blank.
Press the "Submit" button to save your changes.
Paymate - Click here to setup an account with Paymate
Payment Provider Name - Enter the name of the payment provider here.
Show As - If you have multiple forms of payment setup, your customers will have a choice as to which method they prefer. Enter the value you would like your customers to see such as "Credit Card", "Paypal" or "Mastercard, Visa" (without the quotes.)
Active - Place a check in the box to make this payment provider active. If this box is not checked, the payment provider will not show up in the payment provider list during checkout.
Demo - If you would like to test the payment provider settings, place a check in the "Demo" box.
Username - Enter your Paymate username here.
Extra - This field is not used with Paymate payment setup - please leave it blank.
Press the "Submit" button to save your changes.
Authorize.net SIM - Click here to setup an account for Authorize.net account
Payment Provider Name - Enter the name of the payment provider here.
Show As - If you have multiple forms of payment setup, your customers will have a choice as to which method they prefer. Enter the value you would like your customers to see such as "Credit Card", "Paypal" or "Mastercard, Visa" (without the quotes.)
Active - Place a check in the box to make this payment provider active. If this box is not checked, the payment provider will not show up in the payment provider list during checkout.
Demo - If you would like to test the payment provider settings, place a check in the "Demo" box.
Merchant Login ID - Enter your Authorize.net Merchant ID here.
Transaction Key - Enter your transaction key here.
Press the "Submit" button to save your changes.
(The following is from Authorize.net's site)
To obtain a transaction key:
Linkpoint Basic - Click here to setup an account for Linkpoint
Payment Provider Name - Enter the name of the payment provider here.
Show As - If you have multiple forms of payment setup, your customers will have a choice as to which method they prefer. Enter the value you would like your customers to see such as "Credit Card", "Paypal" or "Mastercard, Visa" (without the quotes.)
Active - Place a check in the box to make this payment provider active. If this box is not checked, the payment provider will not show up in the payment provider list during checkout.
Demo - If you would like to test the payment provider settings, place a check in the "Demo" box.
Store Name - Enter your Linkpoint Storename here.
Extra - This field is not used with Linkpoint payment setup - please leave it blank.
Press the "Submit" button to save your changes.
Once you have Linkpoint setup in your classifieds administration you will then need to visit your Linkpoint administration and go to your connection settings.
From this screen you need to enter the Order Submission URL which is http://www.yoursite.com/usercheckout.php.
Next on the thank you page click the check box that says URL is a CGI script.
Payment Provider Name - Enter the name of the payment provider here.
Show As - If you have multiple forms of payment setup, your customers will have a choice as to which method they prefer. Enter the value you would like your customers to see such as "Credit Card", "Paypal" or "Mastercard, Visa" (without the quotes.)
Active - Place a check in the box to make this payment provider active. If this box is not checked, the payment provider will not show up in the payment provider list during checkout.
Demo - If you would like to test the payment provider settings, place a check in the "Demo" box.
Store Name - Enter your Paysystems account name here.
Extra - This field is not used with Paysystems payment setup - please leave it blank.
Press the "Submit" button to save your changes.
Authorize.net AIM - Click here to setup an account for Authorize.net account
Payment Provider Name - Enter the name of the payment provider here.
Show As - If you have multiple forms of payment setup, your customers will have a choice as to which method they prefer. Enter the value you would like your customers to see such as "Credit Card", "Paypal" or "Mastercard, Visa" (without the quotes.)
Active - Place a check in the box to make this payment provider active. If this box is not checked, the payment provider will not show up in the payment provider list during checkout.
Demo - If you would like to test the payment provider settings, place a check in the "Demo" box.
Merchant Login ID - Enter your Authorize.net Merchant ID here.
Transaction Key - Enter your transaction key here.
Press the "Submit" button to save your changes.
(The following is from Authorize.net's site)
To obtain a transaction key:
Important Notes
To use Authorize.net's AIM method your site must have an ssl certificate. To enter your path to SSL please visit the "Main Settings" portion of this user manual.
Next you will need to open your layout.tpl.php template file. If you are using the default template set, this is found in templates/default/layout.tpl.php.
Once you open that file remove the following line:
<base href="{$smarty.const.URL}/" />
Payment Provider Name - Enter the name of the payment provider here.
Show As - If you have multiple forms of payment setup, your customers will have a choice as to which method they prefer. Enter the value you would like your customers to see such as "Credit Card", "Paypal" or "Mastercard, Visa" (without the quotes.)
Active - Place a check in the box to make this payment provider active. If this box is not checked, the payment provider will not show up in the payment provider list during checkout.
Demo - If you would like to test the payment provider settings, place a check in the "Demo" box.
Store Name - Enter your Worldpay account name here.
Extra - This field is not used with Worldpay payment setup - please leave it blank.
Press the "Submit" button to save your changes.
Payment Provider Name - Enter the name of the payment provider here.
Show As - If you have multiple forms of payment setup, your customers will have a choice as to which method they prefer. Enter the value you would like your customers to see such as "Credit Card", "Paypal" or "Mastercard, Visa" (without the quotes.)
Active - Place a check in the box to make this payment provider active. If this box is not checked, the payment provider will not show up in the payment provider list during checkout.
Demo - If you would like to test the payment provider settings, place a check in the "Demo" box.
Extra - This field is not used - please leave it blank.
Press the "Submit" button to save your changes.
The Listing Packages area is where you will create the ad packages that you offer to your customers. 68 Classifieds comes with three ad packages already created which you can use as they are, modify or delete. You can also create additional ad packages by clicking on the "Add New" button.
The main page of the Listing packages shows your existing packages in the first column.
In the second column of the table, you have up and down arrows that let you rearrange the way the packages are displayed to your customers. To move an ad package higher in the list, just click on the corresponding "Up" arrow and the package will move one position up the list. Use the same method to move packages down. Continue with this method until the ad package list is in the order you would like to use.
The third column contains a "Modify" button that forwards you to a page that lets you change the packages features.
The fourth column contains a "Delete" button that will delete the package. You will be asked to confirm the deletion.
Modifying or creating a package
To modify a package, click on the corresponding "Modify" button on the main page of the Listing Packages area. To create a new Listing Package, click on the "Add New" button on the main Listing Packages page. A new page will load in your browser. If you choose to modify an ad, the form will be pre-populated with the ad's details. If you're creating a new package, the form will be blank.
Title - Enter the name for your package.
Description - Enter a description for your package.
List Price - Enter a "Suggested Retail Price" or the "Regular Price" (if you're running a sale). The value in this field will be "striked out" and is mainly used as a marketing tool. Entering a value is not required.
Price - This is the actual price that the ad package costs.
Renewal Price - You can set up your site so that your customers are emailed a notification of pending expiration. Enter the price that you would like your customer to be charged for renewing their ad here.
Maximum number of title characters - Enter the maximum number of characters a customer's ad title can contain.
Maximum number of short description characters - Enter the maximum number of characters a customer's ad's short description can contain.
Maximum number of description characters - Enter the maximum number of characters a customer's ad's long description can contain.
Allow External URL - If you would like to allow your customers to enter a link to another site within their ad, place a check in the "Allow External URL" box.
Allow Photos - Place a check in the "Allow Photos" box if you want to give your customers the ability to upload photos. If you are allowing photos with this package, enter the maximum number of photos your customer can upload in the adjoining textbox.
Expiration - Select the number of days this package will display your customers ad before expiring.
Allow Featured - when the customer is placing an ad, you can give them the opportunity to designate the ad as "featured" by placing a check in the box. A featured ad will stand out from normal ads as designated by your template's stylesheet. The ad will also be included in the "Featured Ads" area on your site. Enter the amount you would like to charge when the customer chooses to make the ad featured.
Allow the user to bold the ad - when the customer is placing an ad, you can give them the opportunity to designate the ad as "bold" by placing a check in the box. A bold ad will stand out from normal ads as designated by your template's stylesheet. Enter the amount you would like to charge when the customer chooses to make the ad bold.
Allow the user to highlight the ad - when the customer is placing an ad, you can give them the opportunity to designate the ad as "highlighted" by placing a check in the box. A higlighted ad will stand out from normal ads as designated by your template's stylesheet. Enter the amount you would like to charge when the customer chooses to make the ad highlighted.
Please select which categories use this field. - When a customer decides to place an ad at your site, their first step is to choose the category where their ad will appear. You can designate which ad categories use the listing package here. To choose multiple categories, use the "Ctrl+click" method (hold down the CTRL key while choosing the categories the package is associated with).
The templates area allows you to modify email templates, page content, and your template files.
68 Classifieds administration includes the ability to create, modify and delete content pages.
Five content pages are included during the initial installation and they are as follows:
You can add new pages or modify existing ones. However you can only delete pages that you have created. You can not delete the 5 listed above.
When you are adding or modifying a page at the bottom it has a select list to show or hide the page from view. However you can override this by manually liking to the page.
To manually link to a page you would create a link in your template to pages.php?page=X where x is the id of the page you want displayed.
68 Classifieds uses a number of email templates that are used when emailing the admin or site users.
From this section you can modify what is included in each email template.
Certain templates have different variables that can be applied and when you are modifying one the available variables will be listed at the bottom.
The template editor is new for v3.1 and allows you to edit a template right from the administration.
In order to use this you will need CHMOD each file to 777 so it is writable by the server.
When you are modifying a template at the bottom of the form it has a compare button which will compare the current file to the original file on 68 Classifieds server. This is useful for comparing your changes with the original and also finding any errors from making changes.
68 Classifieds uses Smarty Templates to create the template files which seperate the php code from the html.
This makes it easier for you to go in and change the site to completely look the way you would like. Through this section we will go through how the files are setup and how it works.
68 Classifieds has a folder named "templates" which holds all the templates that make it look the way it does.
By default inside this folder it has another named "default" which is the default template set and it is not recommended to modify it. Please see the next section for instructions on how to create new templates.
When creating a new template you should first create a new folder inside the "templates" directory.
The majority of the layout is handled through two files and they are layout.tpl.php and style.css so you would take these two files and add them to your new folder.
Now you can upload this folder and these files then change your template in administration -> main settings and you will have a new look to your website.
If you look at your site and see another page you would like to modify but are unsure which template file it is you can add ?debug=TRUE to the querystring and a popup will appear giving you information about the template files in use as well as a list of all the variables available for the page.
Once you get the file name you can then move that file out of the default template folder and move it into your new folder.
68 Classifieds works by using two template paths. The one you have defined and the default. So if it can find a file in your template folder it will use the default.
You can find a great tutorial for creating templates at our user forums.
This section lists common frequently asked questions.
The password is stored in the user table and it is encrypted. You can get a new password by visiting http://yoursite.com/userforgot.php and having a new one resent.
Once you receive the new password try logging in to the administration. If you are unable to login you will need to login to your database control panel such phpmyadmin then go the user table and find your username. Next modify it and change the level to 1.
As most of you are aware, Spam is an epidemic and there is no sign of a cure on the horizon. Many ISP (Internet Service Providers) and Web Hosting companies have implemented filters and such to try and catch known sources but the flood of spam persists.
With the above in mind, we as "web masters" have a few things to consider, especially if your web site allows for your visitors to communicate with you and each other via E-mail.
For starters, its important that people who use your site and supply you with an E-mail address are safe from people who seek to collect or farm these E-mail addresses in an effort to build a Spam list.
68 Classifieds does a good job of protecting or visitors E-mail addresses by allowing us to make the field invisible and by allowing visitors to fill out a web based form which in turn sends an E-mail thereby keeping the recipients E-mail address hidden from those who may seek to use it for no good.
Next, we need to understand how web based forms send E-mail. Web based forms in and of themselves can simply pass data thats entered into them. This data in turn needs to be handled by some sort of "program" to get from the web form to the E-mail recipient. In the case of 68 Classifieds the form input is handled via PHP which is a server side scripting language.
Now, PHP in and of itself can not send E-mail, what it does is take the form data and it builds the E-mail message and then passes this message on to an E-mail server running on the web host. The E-mail Server in turn sends along the E-mail message to the E-mail server in charge of handling E-mail for the recipients Domain where it waits for the recipeint to use a mail client (ie Eudora, outlook etc) to connect to their local E-mail Server and request inbound mail.
Since PHP (and server side scripts in general) can so easily build E-mail messages and pass them along to the E-mail server spammers have exploited the use of PHP (and server side scripts in general) to send out massive amount of unsolicited mail. When using an E-mail client (ie Eudora, Outlook etc) the programs generally follow strict adherance in regards to the header information contained in an E-mail message when they send it. Mail that is created and sent via a script does not need to adhere to these rules and thus can easily be abused. For example I am sure we have all gotten e-mail that is addressed to someone other than you and has an invalid sender as well.
In an effort to curtail abuse of their E-mail Servers, many Web hosts have put restrictions in place to control how mail is sent. PHP has a built in function called mail() which is specifically designed to work with Sendmail (one of the most prominent E-mail Server in use today). The problem that Web Hosts face is that scripts function on the server as a user and generally that user is "nobody".
Ok, so what does that have to do with me you saying? Well, for starters, many Web hosts have their E-mail servers set up to not accept mail from their own clients if it has an invalid mail header. Some have even disabled the PHP mail() function altogether. Others allow the PHP mail() function but require the header be complete. Some require us to use SMPT (Simple Mail Transfer Protocol which is just another protocol for sending mail to a server) and then even others require the use of SMTP AND authentication, which means you have to actually use your user name and password for every mail message sent so they can make sure your are a client. Additionally many ISP's will automatically filter incoming mail from other E-mail servers that dont have valid mail headers.
Due to the wide range of limitations imposed by various Web Hosts here is something I recommend for anyone installing 68 classifieds.
Contact your web hosting company and let them know you have a PHP script you want to run that utilizes web based form to send E-mail and ask them what limitations, if any, are in place on scripts sending mail.
68 Classifieds uses a very complete e-mail class to handle E-mail and can easily be made to work with almost any set of rules you web host may have in place. The key is just finding out what limitations are in place so the changes can be made.
If you find that after installing 68 Classifieds that the various E-mail functions(ie contact us, contact seller and registration e-mails) arent working, chances are the problem is due to the restrictions put in place by your web host.
No need to panic! Just post up the reply you got from your web host regarding their scripts sending E-mail limitations and youll be up and running in no time.
Written by lhotch
68 Classifieds comes with a variety of prebuilt template functions that you can use throughout the script. The following sections help describe the different functions and how to call them.
Featured listings horizontal calls a function and displays all your featured listings in a horizontal table.
To call this function you would include the following code in any template file you want it to appear.
The code above calls a smarty custom plugin that we have created. The file is located at includes/templates/plugins/function.feature_listings_horizontal.php
Featured listings vertical calls a function and displays all your featured listings in a vertical table.
To call this function you would include the following code in any template file you want it to appear.
The code above calls a smarty custom plugin that we have created. The file is located at includes/templates/plugins/function.feature_listings_vertical.php
Most Viewed calls a function and displays your most viewed listings in a table.
To call this function you would include the following code in any template file you want it to appear.
This function has one different attribute from the featured listings and it is:
img_break
The img_break defines what happens after the image is shown. In the example above a <br> or line break is added. This function is also meant to be shown vertically.
New Listings calls a function and displays your most viewed listings in a table.
To call this function you would include the following code in any template file you want it to appear.
This function has two different attribute from the featured listings and it is:
img_break
date_format
The img_break defines what happens after the image is shown. In the example above a <br> or line break is added. This function is also meant to be shown vertically.
The date_format is how you want the date to be displayed. The default is %B %e,%Y %I:%M %p or December 1, 2005 05:13:23. You can pass any date format you prefer and a list of variables is available here:
http://smarty.php.net/manual/en/lang...ate.format.php
This function is also meant to be shown vertically.
In short yes you can. However you will need to modify your template files.
Normally for a feature like this you would want a small form maybe at the top of your site so that is how we will set this up.
First open your layout.tpl.php file and locate the place you want to add this form.
Next include the following code:
This is possible but requires a custom function. You can detailed instructions at the following link:
http://www.68classifieds.com/forums/showthread.php?t=62
Also you can use this same type of setup to display the total users.
http://www.68classifieds.com/forums/showthread.php?t=63